
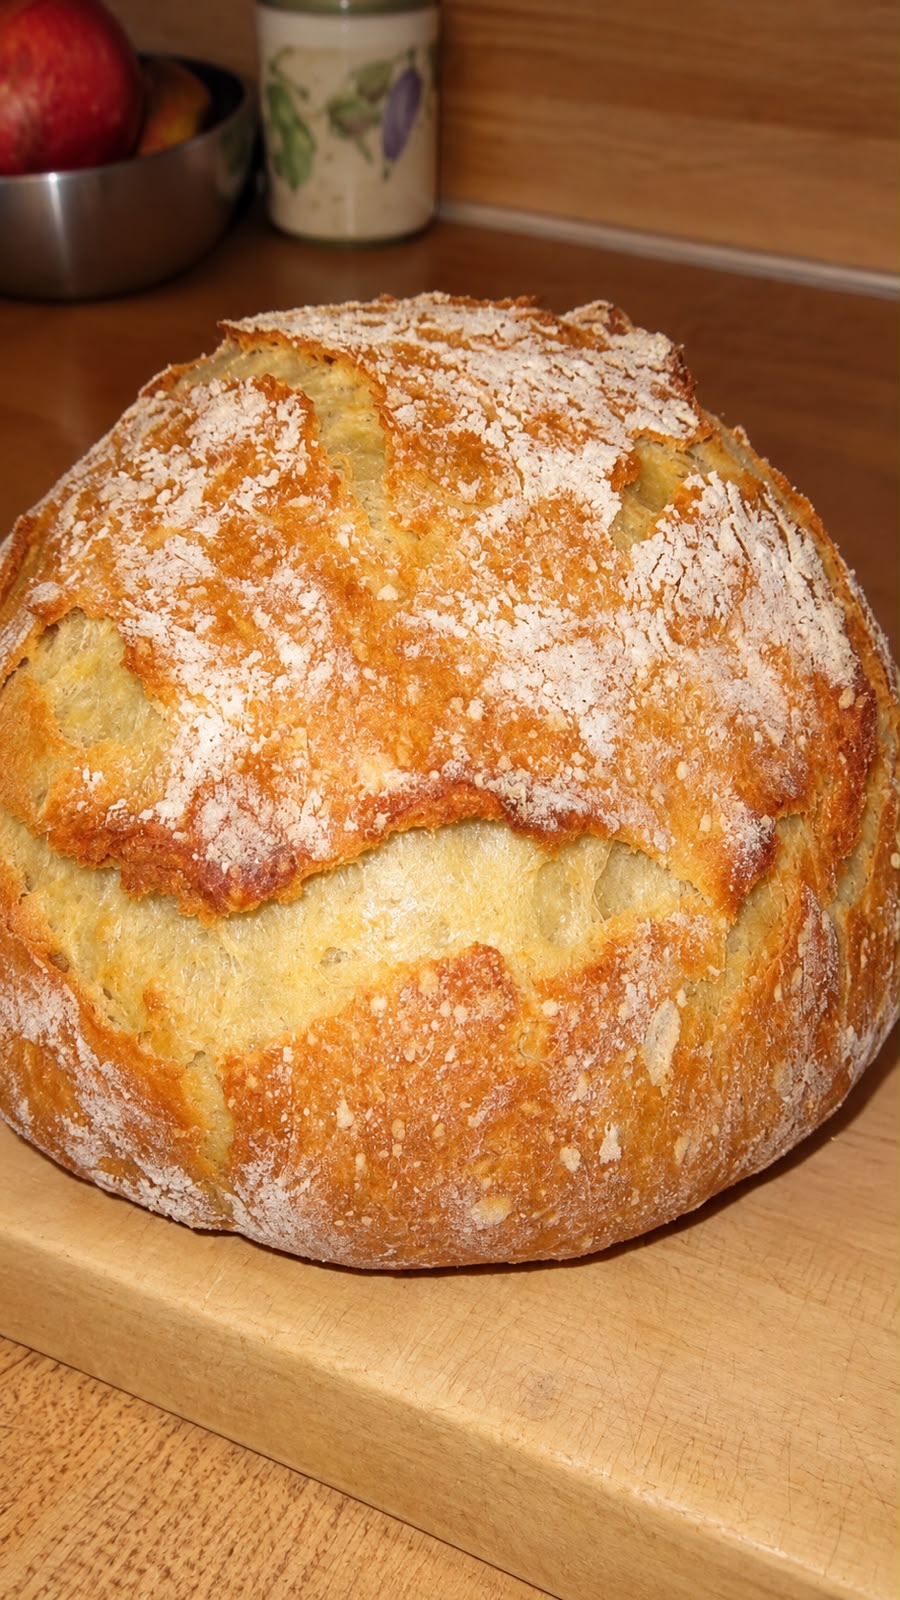
If you’ve ever wanted to make homemade bread but thought you needed special equipment, complicated techniques, or hours of kneading, this Crusty No-Knead Bread recipe is about to change your mind.
This easy homemade bread has a beautifully golden, crackly crust and a soft, chewy center filled with those gorgeous irregular air pockets you usually associate with artisan bakery bread. The best part? There is absolutely no kneading required.
You simply stir together flour, salt, instant yeast, and warm water, cover the bowl, and let time do the work. After a long overnight rise, the dough goes into a preheated Dutch oven, where it develops an incredible crust while staying soft and chewy inside.
It’s the kind of bread that makes your kitchen smell like a bakery and looks far more complicated than it actually is.
Why You’ll Love This No-Knead Bread
There are plenty of homemade bread recipes out there, but this one is especially appealing because it’s so simple.
You don’t need a stand mixer.
You don’t need a bread machine.
You don’t need to knead the dough for 10 or 15 minutes.
You don’t even need advanced bread-making skills.
All you need is a bowl, a spoon, a few basic ingredients, and a little patience.
Here’s why this recipe works so well:
- No kneading required
- Only 4 basic ingredients
- Minimal hands-on preparation
- Overnight fermentation develops incredible flavor
- Dutch oven creates a bakery-style crust
- Soft, chewy interior
- Beautiful open air pockets
- Perfect for sandwiches, toast, and dipping
- Excellent with butter and jam
- Easy enough for beginners
The secret isn’t complicated technique. It’s time.
The long fermentation allows the dough to develop flavor and structure while you do absolutely nothing.
What Is No-Knead Bread?
No-knead bread is a type of bread made with a very simple dough that doesn’t require traditional kneading.
Instead of developing the gluten through extensive kneading, the dough relies on time and fermentation.
The dough is mixed until the ingredients are combined, then left to rise for many hours. During this time, the gluten develops naturally, creating the structure needed for a chewy loaf.
When the dough is baked in a hot, covered Dutch oven, the enclosed environment traps steam. This helps the loaf expand and produces the characteristic crisp, crackly crust associated with artisan bread.
What Makes This Bread So Crusty?
The Dutch oven is one of the biggest secrets to achieving that bakery-style crust.
When the dough first enters the extremely hot Dutch oven, the moisture released from the dough creates steam inside the covered pot.
That steam keeps the surface of the dough moist during the early stage of baking, allowing the bread to expand before the crust fully sets.
After 30 minutes, the lid is removed. The remaining baking time allows the outside to become deeply golden brown and wonderfully crisp.
The result is a loaf with a crackling crust and soft, chewy interior.
Ingredients for Crusty No-Knead Bread
You only need four basic ingredients.
3 Cups All-Purpose Flour
Regular all-purpose flour works beautifully for this recipe.
If you’d like a slightly heartier loaf, you can replace up to 1 cup of the all-purpose flour with whole wheat flour.
1¾ Teaspoons Salt
Salt isn’t just for flavor. It also plays an important role in the fermentation and structure of the dough.
Don’t skip it.
½ Teaspoon Instant Yeast
A surprisingly small amount of yeast is all you need because this bread uses a long fermentation time.
Instant yeast is particularly convenient because it can be mixed directly into the flour.
1½ Cups Warm Water
Warm water helps the yeast get started.
The water should be warm rather than hot. Extremely hot water can damage the yeast.
How to Make Crusty No-Knead Bread
Step 1: Mix the Dry Ingredients
Add the all-purpose flour, salt, and instant yeast to a large mixing bowl.
Whisk everything together until the ingredients are evenly distributed.
Step 2: Add the Water
Pour in the warm water.
Using a wooden spoon or sturdy spatula, stir everything together until no large patches of dry flour remain.
The dough will look shaggy, sticky, and rough.
Don’t worry.
That’s exactly what you’re looking for.
Resist the temptation to add lots of extra flour. A wet dough is an important part of creating the beautiful open texture inside the finished loaf.
Step 3: Let the Dough Rise
Cover the bowl tightly with plastic wrap or a kitchen towel.
Leave it at room temperature for approximately 12–18 hours.
This long rise is where much of the flavor and texture develops.
After rising, the dough should look bubbly, expanded, and loose.
You may see bubbles across the surface and around the edges of the dough.
Step 4: Preheat the Dutch Oven
When you’re ready to bake, place your Dutch oven, including its lid, inside the oven.
Preheat the oven to 450°F (232°C) and allow the Dutch oven to heat for approximately 30 minutes.
Preheating the pot is important because the dough needs to hit a very hot surface when it goes into the oven.
Step 5: Shape the Dough
Generously flour your work surface.
Carefully scrape the dough out of the bowl.
It will be sticky.
Using floured hands, gently fold the dough over itself a few times and shape it into a rough round.
You don’t need to create a perfect ball.
Don’t knead the dough.
The goal is simply to give it enough shape to hold together while it bakes.
Step 6: Transfer the Dough to the Dutch Oven
Carefully remove the extremely hot Dutch oven from the oven.
Place the dough inside.
Be very careful during this step because the pot and lid will be extremely hot.
Cover the Dutch oven with the lid and immediately return it to the oven.
Step 7: Bake Covered
Bake the bread covered for 30 minutes.
During this stage, the trapped steam helps the bread rise and develop its crust.
Step 8: Finish Baking Uncovered
Remove the lid and continue baking for another 10–15 minutes.
The bread should become a deep golden brown with a beautifully crisp exterior.
If you prefer a darker, more deeply caramelized crust, you can allow it to bake slightly longer while keeping a close eye on it.
Step 9: Cool Before Slicing
Remove the loaf from the Dutch oven and place it on a wire rack.
Let it cool for at least 10 minutes before slicing.
For the best crumb texture, allowing the bread to cool longer is even better.
You may hear the crust crackling as the loaf cools.
That’s one of the most satisfying sounds in homemade baking.
Why Does No-Knead Bread Work Without Kneading?
Traditional bread recipes often use kneading to develop gluten.
Gluten gives bread its structure and allows it to stretch and hold onto the gases produced during fermentation.
With no-knead bread, you simply give the dough more time.
During the long fermentation period, the flour becomes fully hydrated and gluten develops naturally.
The yeast also has plenty of time to ferment the dough and create flavor.
That’s why a dough that initially looks like a sticky mess can eventually become a beautiful artisan-style loaf.
How Long Should No-Knead Bread Rise?
For this recipe, allow the dough to rise for 12–18 hours at room temperature.
The exact timing can vary depending on the temperature of your kitchen.
A warmer room generally speeds up fermentation, while a cooler room slows it down.
Rather than focusing only on the clock, look at the dough.
You’re looking for dough that has:
- Increased significantly in volume
- Lots of visible bubbles
- A loose, airy appearance
- A slightly domed or spread-out surface
Can I Let the Dough Rise Longer?
A longer fermentation can sometimes work, but there is a limit.
If the dough ferments for too long, the gluten structure can weaken and the dough may become excessively loose or develop an overly fermented flavor.
For most kitchens, 12–18 hours is a convenient window.
If your kitchen is particularly warm, check the dough earlier.
Tips for Perfect No-Knead Bread
Don’t Add Too Much Flour
The dough is supposed to be sticky.
Adding excessive flour during shaping can produce a denser loaf.
Use enough flour to make handling possible, but don’t try to turn the dough into a dry, firm ball.
Use a Dutch Oven With a Lid
A Dutch oven is ideal because it traps steam around the loaf.
This helps produce the signature crisp crust.
Preheat the Pot
Don’t put the dough into a cold Dutch oven unless the recipe specifically calls for it.
A thoroughly preheated pot helps create better oven spring and crust development.
Don’t Skip the Long Rise
The long fermentation is one of the most important parts of this recipe.
It’s responsible for much of the flavor and texture.
Let the Bread Cool
It’s tempting to cut into the loaf immediately.
But freshly baked bread is still finishing its internal cooking and setting its crumb.
Give it at least 10 minutes before slicing.
Why Is My No-Knead Bread Dense?
There are several possible reasons.
The yeast may not have been active enough, the dough may not have fermented for long enough, or too much flour may have been added during shaping.
Another possibility is that the dough was handled too aggressively.
Remember that this recipe is intentionally simple.
The dough doesn’t need to be kneaded or worked extensively.
Why Didn’t My Bread Rise?
If your dough hasn’t expanded after many hours, check your yeast and the temperature of your kitchen.
Old or improperly stored yeast may have reduced activity.
Very cold temperatures can also significantly slow fermentation.
The water should be warm rather than extremely hot when you mix the dough.
Why Is My Crust Not Crispy?
A few things can affect crust crispness.
Make sure your Dutch oven is thoroughly preheated and that you bake the bread uncovered for the final 10–15 minutes.
If you remove the loaf from the oven too early, the crust may not have enough time to develop its deep golden color and crisp texture.
Cooling the loaf uncovered on a wire rack also helps prevent trapped steam from softening the crust.
Can I Use Whole Wheat Flour?
Yes.
For a heartier loaf, replace up to 1 cup of the all-purpose flour with whole wheat flour.
Keep in mind that whole wheat flour absorbs more water and can produce a somewhat denser loaf.
For the lightest, most open crumb, using all-purpose flour is the easiest option.
Can I Add Other Ingredients?
Absolutely.
Once you’re comfortable with the basic recipe, you can experiment with different flavors.
Garlic and Herb Bread
Add minced garlic and dried or fresh herbs for a savory loaf.
Rosemary Bread
Fresh rosemary pairs beautifully with the rustic flavor of homemade bread.
Cheddar Bread
Fold shredded cheddar cheese into the dough for a rich, savory variation.
Jalapeño Cheddar Bread
Add diced jalapeños and shredded cheddar for a spicy loaf.
Cranberry Walnut Bread
For a sweet and savory combination, add dried cranberries and chopped walnuts.
Everything Bagel Bread
Sprinkle everything bagel seasoning over the loaf before baking.
How to Store Homemade No-Knead Bread
Once the bread has cooled completely, store it at room temperature in a bread bag or loosely wrapped in a clean kitchen towel.
Avoid sealing freshly baked bread in an airtight container while it’s still warm, as trapped moisture can soften the crust.
For the best crust, homemade bread is generally at its best within the first couple of days.
Can You Freeze No-Knead Bread?
Yes.
Allow the loaf to cool completely.
Wrap it tightly in plastic wrap or foil, then place it in a freezer-safe bag.
Freeze for up to several months for best quality.
When you’re ready to eat it, thaw the loaf at room temperature.
You can place it in a hot oven for several minutes to help refresh the crust.
What to Serve With Crusty Homemade Bread
This bread is incredibly versatile.
Serve warm slices with:
- Salted butter
- Homemade jam
- Honey
- Peanut butter
- Avocado
- Scrambled eggs
- Soup
- Stew
- Pasta
- Roasted vegetables
- Cheese
- Deli meats
It’s also fantastic for making sandwiches.
The sturdy crust and chewy interior make it particularly satisfying with hearty sandwich fillings.
Why This Bread Is Perfect for Beginners
Bread baking can seem intimidating because many traditional recipes involve kneading, proofing, shaping, and multiple rises.
This recipe removes much of that complexity.
There’s no stand mixer required.
There’s no complicated kneading technique.
There’s no need to obsess over perfectly shaping the dough.
The long fermentation does most of the work for you.
That’s what makes this easy no-knead bread such a great recipe for beginners.
Frequently Asked Questions
Do you really not have to knead this bread?
No kneading is required. Simply mix the ingredients until they form a shaggy dough and allow the long fermentation period to develop the dough naturally.
What flour is best for no-knead bread?
All-purpose flour works very well for this recipe. Bread flour can also be used if you prefer a slightly chewier loaf.
Can I make this bread without a Dutch oven?
A Dutch oven is ideal because it traps steam, but other oven-safe covered baking vessels may work. The important thing is that the vessel can safely withstand a very high oven temperature.
Can I make no-knead bread overnight?
Yes. That’s one of the easiest ways to make it. Mix the dough in the evening, let it rise overnight, and bake it the following day.
How do I know when the bread is done?
The loaf should have a deep golden-brown crust and sound hollow when tapped. The internal temperature should generally be around 200–210°F when fully baked.
Why is my dough so sticky?
That’s normal. No-knead dough is intentionally wetter than many traditional bread doughs. Use flour on your hands and work surface when shaping rather than adding large amounts of flour directly to the dough.
Can I use active dry yeast instead of instant yeast?
Active dry yeast can generally be used, although it may benefit from being dissolved in the warm water first. Instant yeast can be mixed directly into the dry ingredients.
The Easiest Homemade Bread You’ll Make
There is something incredibly satisfying about pulling a beautiful loaf of bread out of your oven when you know how little effort went into making it.
You mix four simple ingredients.
You let the dough rest overnight.
You heat up a Dutch oven.
Then you bake.
That’s it.
And somehow, the result is a loaf with a crackly golden crust, chewy interior, and beautiful irregular air pockets that looks like it came straight from an artisan bakery.
Once you make this Crusty No-Knead Bread, you may never look at a basic grocery store loaf quite the same way again.
Serve it warm with butter and jam for breakfast, alongside a bowl of soup for lunch, or use it to make your favorite sandwiches.
It’s simple, inexpensive, incredibly satisfying, and easy enough to become part of your weekly baking routine.
Crusty No-Knead Bread Recipe
Ingredients
- 3 cups all-purpose flour
- 1¾ teaspoons salt
- ½ teaspoon instant yeast
- 1½ cups warm water
- Up to 1 cup whole wheat flour can replace some of the all-purpose flour for a heartier loaf
Instructions
- In a large bowl, whisk together the flour, salt, and instant yeast.
- Add the warm water and stir with a wooden spoon until a shaggy, sticky dough forms.
- Cover the bowl with plastic wrap or a clean kitchen towel and let the dough rest at room temperature for 12–18 hours.
- When ready to bake, place a Dutch oven with its lid inside the oven. Preheat to 450°F (232°C) and heat the Dutch oven for about 30 minutes.
- Turn the dough onto a generously floured surface. Gently fold it over itself several times and shape it into a rough round.
- Carefully remove the hot Dutch oven and place the dough inside.
- Cover with the lid and bake for 30 minutes.
- Remove the lid and continue baking for 10–15 minutes, until the crust is deep golden brown and crisp.
- Carefully remove the bread and place it on a wire rack.
- Let it cool for at least 10 minutes before slicing.
Recipe Notes
Prep time: 10 minutes
Rise time: 12–18 hours
Bake time: 40–45 minutes
Total time: About 13–19 hours, mostly unattended
Yield: 1 large loaf
Temperature: 450°F (232°C)
Category: Bread
Cuisine: American / Artisan-style
Keyword: Crusty No-Knead Bread, No-Knead Bread, Dutch Oven Bread, Easy Homemade Bread