
If you’ve ever heard someone say, “Who on earth eats okra and thinks this is delicious?”—you’re definitely not alone. For many people, okra has a reputation that precedes it. Some think of it as slimy, strange, or simply unfamiliar. But for those who know how to cook it properly, especially when it’s fried to golden perfection, okra becomes one of the most addictive and satisfying snacks you can make at home.
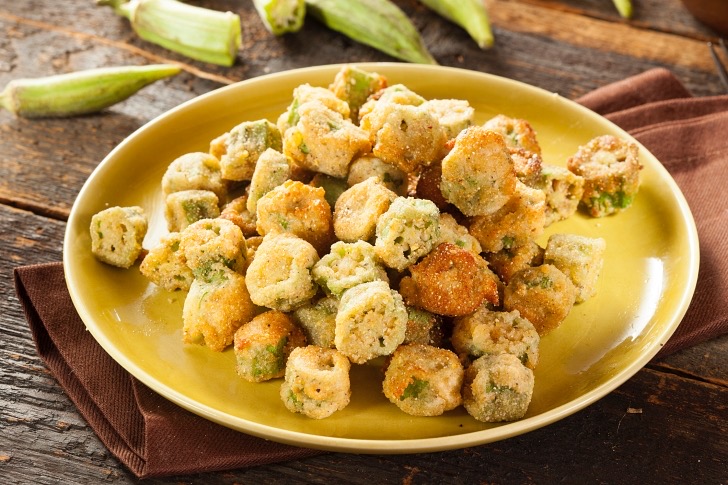
Crispy fried okra is a beloved comfort food across many regions, particularly in the American South, where it has become a staple side dish in countless homes and restaurants. The secret lies in transforming the vegetable’s natural texture through slicing, seasoning, coating, and frying it until each bite becomes crunchy on the outside and tender on the inside.
In this comprehensive guide, you’ll discover everything you need to know about preparing perfect fried okra—from its history and nutritional benefits to detailed cooking instructions, expert tips, serving ideas, storage guidance, and creative variations. By the end of this article, even the biggest okra skeptics might find themselves reaching for seconds.
What Is Okra?
Okra is a green flowering plant valued for its edible seed pods. It thrives in warm climates and is widely cultivated across Africa, the Middle East, South Asia, and the southern United States. The vegetable is recognizable for its long, ridged pods and small white seeds inside.
When cooked in stews or soups, okra releases a natural mucilage, which acts as a thickening agent. This is why it’s commonly used in dishes like gumbo. However, when okra is fried, roasted, or grilled, that texture disappears and is replaced by a delightful crispiness.
Because of this transformation, fried okra has become one of the most popular ways to enjoy the vegetable—even among people who normally avoid it.
Why Fried Okra Is So Popular
There are several reasons why fried okra has become such a beloved dish:
1. Incredible Crunch
The cornmeal coating creates a crispy shell that locks in the flavor and moisture of the okra while eliminating any slimy texture.
2. Simple Ingredients
Most fried okra recipes require only a handful of pantry staples like cornmeal, flour, salt, and pepper.
3. Versatile Dish
Fried okra can be served as a snack, appetizer, side dish, or even added to salads and bowls.
4. Quick to Prepare
Once the okra is sliced and coated, it cooks in just a few minutes.
5. Comfort Food Appeal
Its warm, crunchy texture makes it a favorite at family dinners, barbecues, and holiday gatherings.
Ingredients for Perfect Crispy Fried Okra
To make restaurant-quality fried okra at home, you’ll need the following ingredients:
Main Ingredients
- 1 pound fresh okra pods
- 1 cup cornmeal
- ½ cup all-purpose flour
- 1 teaspoon salt
- ½ teaspoon black pepper
- ½ teaspoon garlic powder
- ½ teaspoon paprika
- 1 cup buttermilk (or regular milk)
- Vegetable oil for frying
Optional Ingredients for Extra Flavor
- ¼ teaspoon cayenne pepper for heat
- ½ teaspoon onion powder
- 1 teaspoon smoked paprika
- grated parmesan cheese for serving
These optional additions can help enhance the flavor profile depending on your taste preferences.
How to Choose Fresh Okra
Choosing good-quality okra is essential for achieving the best results.
Look for pods that are:
- Bright green
- Firm to the touch
- About 2–4 inches long
- Free from dark spots or wrinkles
Smaller pods are generally more tender and less fibrous than larger ones.
Avoid overly large okra pods because they can become tough and woody when cooked.
Step-by-Step Instructions for Making Fried Okra
Step 1: Wash and Dry the Okra
Start by rinsing the okra under cool running water to remove dirt and debris. After washing, dry the pods thoroughly with paper towels.
Removing excess moisture is important because it helps the coating stick better and prevents oil splattering during frying.
Step 2: Slice the Okra
Using a sharp knife, trim off the stem ends. Then slice the pods into small rounds about ½ inch thick.
You’ll notice the small white seeds inside each piece—these are perfectly edible and add a subtle nutty flavor when cooked.
Step 3: Prepare the Coating Mixture
In a medium mixing bowl, combine:
- Cornmeal
- Flour
- Salt
- Black pepper
- Garlic powder
- Paprika
Mix well until the seasoning is evenly distributed.
The combination of cornmeal and flour creates the ideal crispy coating.
Step 4: Soak the Okra in Buttermilk
Place the sliced okra into a bowl of buttermilk and let it soak for about 5 minutes.
This step helps tenderize the vegetable and allows the coating to adhere better.
If you don’t have buttermilk, regular milk with a teaspoon of lemon juice or vinegar works as a good substitute.
Step 5: Coat the Okra
Remove the okra from the buttermilk and allow excess liquid to drip off.
Transfer the pieces into the cornmeal mixture and toss them until each slice is completely coated.
For an extra crunchy texture, you can repeat the process by dipping the coated okra back into the milk and coating it again.
Step 6: Heat the Oil
Pour about 1 inch of vegetable oil into a deep skillet or frying pan.
Heat the oil to approximately 350°F (175°C). If you don’t have a thermometer, you can test the oil by dropping in a small piece of coated okra. If it sizzles immediately, the oil is ready.
Step 7: Fry the Okra
Carefully add the coated okra into the hot oil in small batches.
Avoid overcrowding the pan, as this can cause the temperature to drop and make the okra soggy.
Fry for about 3–4 minutes, stirring occasionally, until the pieces become golden brown and crispy.
Step 8: Drain the Okra
Use a slotted spoon to remove the fried okra from the oil.
Place the pieces on a plate lined with paper towels to absorb excess oil.
Immediately sprinkle a pinch of salt while they’re still hot.
Tips for the Crispiest Fried Okra
Making great fried okra is simple, but a few expert tips can elevate your results.
Use Cornmeal Instead of Breadcrumbs
Cornmeal provides the authentic crunchy texture that fried okra is known for.
Don’t Skip the Buttermilk
Buttermilk adds flavor and helps the coating stick evenly.
Maintain the Right Oil Temperature
Oil that’s too cool makes the okra greasy. Oil that’s too hot burns the coating before the inside cooks.
Fry in Small Batches
Overcrowding the pan prevents proper crisping.
Serve Immediately
Fried okra tastes best when fresh and hot.
Flavor Variations
Once you master the basic recipe, you can experiment with different seasonings.
Spicy Fried Okra
Add cayenne pepper and chili powder for a spicy kick.
Garlic Parmesan Okra
Sprinkle grated parmesan cheese and garlic powder over the hot okra.
Cajun Fried Okra
Mix Cajun seasoning into the coating mixture.
Air Fryer Okra
For a healthier version, cook coated okra in an air fryer at 400°F for about 12 minutes.
Tempura Okra
Dip whole pods in a light tempura batter instead of cornmeal.
What to Serve With Fried Okra
Fried okra pairs beautifully with a wide variety of meals.
Some popular combinations include:
- grilled chicken
- barbecue ribs
- fried fish
- burgers
- roasted vegetables
It also works wonderfully as a snack with dipping sauces.
Best Dipping Sauces
Adding a dipping sauce can elevate fried okra even further.
Try serving it with:
- ranch dressing
- spicy mayo
- garlic aioli
- honey mustard
- barbecue sauce
Each sauce brings a different flavor dimension to the dish.
Nutritional Benefits of Okra
Despite being fried in this recipe, okra itself is a highly nutritious vegetable.
It contains:
- Vitamin C
- Vitamin K
- Folate
- Magnesium
- Fiber
- Antioxidants
These nutrients contribute to heart health, digestive support, and immune system function.
Okra is also relatively low in calories, making it a good vegetable choice when prepared in healthier ways.
How to Store Leftover Fried Okra
If you have leftovers, proper storage will help maintain the flavor.
Refrigeration
Place cooled okra in an airtight container and store in the refrigerator for up to 3 days.
Reheating
Reheat in an oven or air fryer at 375°F for about 5 minutes to restore crispiness.
Avoid microwaving, as it tends to make the coating soft.
Can You Freeze Fried Okra?
Yes, but it’s best to freeze it before frying.
To do this:
- Coat the okra in the cornmeal mixture.
- Spread the pieces on a baking sheet.
- Freeze until solid.
- Transfer to a freezer bag.
When ready to cook, fry directly from frozen.
Common Mistakes to Avoid
Even simple recipes can go wrong if certain steps are skipped.
Not Drying the Okra
Moisture prevents the coating from sticking.
Using Old Oil
Old oil affects flavor and crispness.
Overcrowding the Pan
This lowers the oil temperature and creates soggy results.
Cooking Too Long
Okra cooks quickly and can burn if left too long.
Why Even Okra Haters Love This Recipe
Many people who claim to dislike okra have only tried it in soups or stews where the texture becomes slippery.
Frying completely transforms the vegetable.
The crunchy coating, savory seasoning, and golden color create a snack that feels more like popcorn or crispy fries than a vegetable dish.
That’s why fried okra often surprises first-time tasters and turns skeptics into fans.
Final Thoughts
Crispy fried okra is proof that simple ingredients can produce extraordinary results. With just a few pantry staples and fresh okra pods, you can create a snack or side dish that’s crunchy, flavorful, and incredibly satisfying.
Whether you’re serving it alongside a hearty meal, bringing it to a family gathering, or enjoying it as a late-night snack, fried okra delivers comfort and flavor in every bite.
So the next time someone asks, “Who actually eats okra and thinks it’s delicious?”—you’ll know the answer.