
The Perfect No-Bake Easter Treat
If you’re looking for a simple yet impressive Easter dessert, these Chocolate Peanut Butter Easter Nests are guaranteed to become a holiday favorite. Combining the irresistible flavors of rich milk chocolate, creamy peanut butter, and crispy chocolate cereal, these adorable nests are as delicious as they are festive.
Perfect for Easter celebrations, spring gatherings, school parties, or family baking days, these no-bake treats require minimal effort and deliver maximum flavor. The crunchy texture of the cereal coated in smooth chocolate and peanut butter creates the perfect base for colorful pastel candy eggs, making each nest look like a miniature edible work of art.
One of the best things about this recipe is how easy it is to make. There is no oven required, very little cleanup, and the ingredients are affordable and readily available. Whether you’re making them with children or preparing a quick holiday dessert, these Easter nests are a fun and stress-free option.
Why You’ll Love These Easter Nests
- No baking required
- Ready in under 30 minutes
- Perfect for kids and adults
- Great make-ahead dessert
- Budget-friendly ingredients
- Ideal for Easter dessert tables
- Easy enough for beginner cooks
- Customizable with your favorite candies
Ingredients
For the Easter Nests
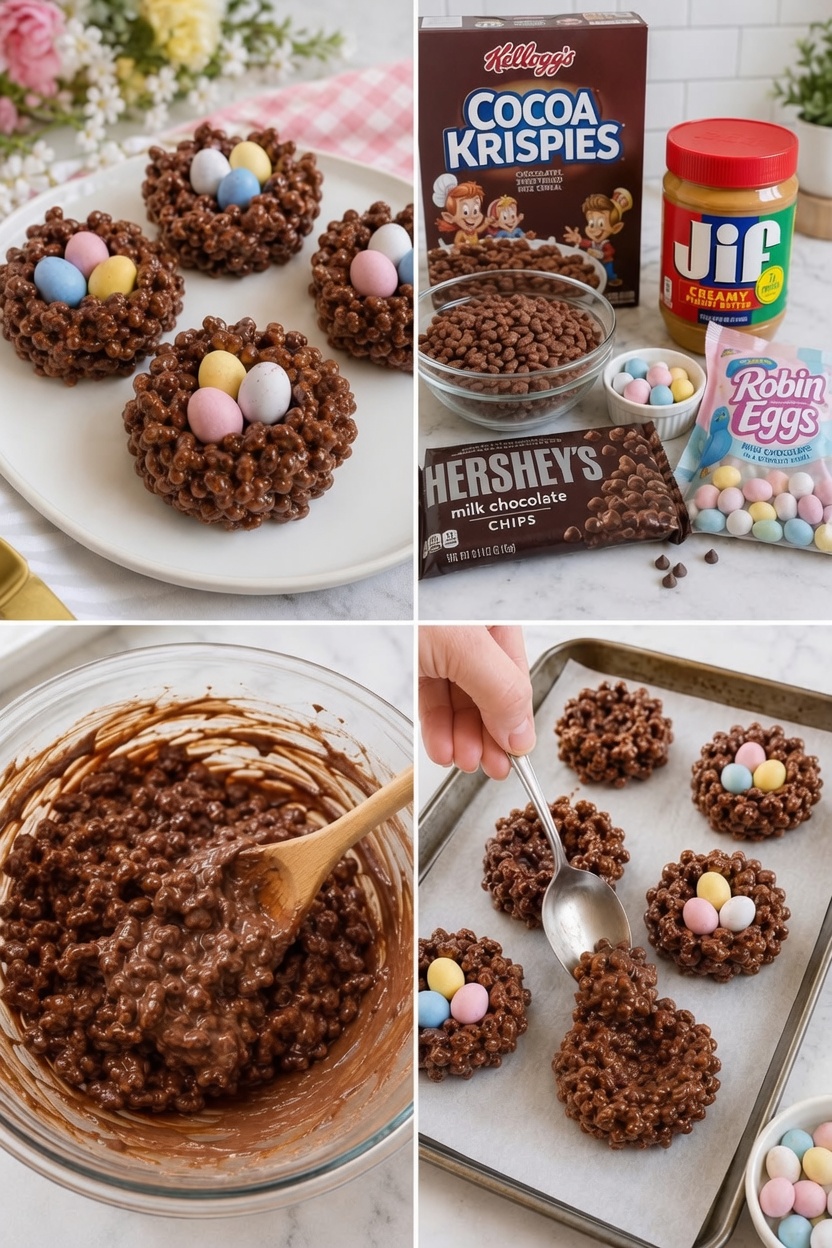
- 4 cups Cocoa Krispies cereal
- 1 cup milk chocolate chips
- 1 cup creamy peanut butter
- 1 tablespoon butter (optional, for easier melting)
For Decorating
- 1 bag pastel chocolate candy eggs
- Parchment paper or nonstick cooking spray
Equipment Needed
- Large mixing bowl
- Microwave-safe bowl
- Baking sheet or tray
- Spoon or cookie scoop
- Parchment paper
Instructions
Step 1: Prepare Your Work Surface
Line a baking sheet, tray, or large plate with parchment paper. This will prevent the nests from sticking and make cleanup much easier. If parchment paper isn’t available, lightly coat the surface with nonstick cooking spray.
Step 2: Melt the Chocolate and Peanut Butter
Place the milk chocolate chips, creamy peanut butter, and optional butter into a microwave-safe bowl.
Microwave in 30-second intervals, stirring thoroughly after each interval. Continue heating until the mixture becomes completely smooth, glossy, and fully combined. Be careful not to overheat the chocolate, as it can scorch easily.
Step 3: Coat the Cereal
Pour the Cocoa Krispies cereal into a large mixing bowl. Slowly pour the melted chocolate-peanut butter mixture over the cereal.
Using a spatula or large spoon, gently fold the cereal into the mixture until every piece is evenly coated. Take care not to crush the cereal while stirring.
Step 4: Shape the Nests
Using a spoon or cookie scoop, place portions of the mixture onto the prepared baking sheet. Each mound should be approximately 2 to 3 inches wide.
With the back of a spoon, gently press down in the center of each mound to create a small indentation. This forms the nest shape and provides a place for the candy eggs.
Step 5: Add the Candy Eggs
While the nests are still soft, place 3 to 4 pastel chocolate eggs into the center of each nest. Press them lightly into the mixture so they stay in place as the nests set.
Step 6: Let Them Set
Allow the nests to firm up at room temperature for about 45 minutes to 1 hour.
For quicker results, place the tray in the refrigerator for 20 to 30 minutes until the nests are fully set and easy to handle.
Step 7: Serve and Enjoy
Once firm, carefully remove the nests from the parchment paper and arrange them on a serving platter. Enjoy immediately or store for later.
Tips for Success
- Use fresh cereal for maximum crunch.
- Stir the chocolate mixture frequently while melting to prevent burning.
- Chill the nests if your kitchen is warm.
- Use a cookie scoop to create evenly sized nests.
- Add the candy eggs before the mixture hardens for best results.
Fun Variations
White Chocolate Easter Nests
Replace the milk chocolate chips with white chocolate chips for a sweeter and lighter version.
Mini Egg Deluxe Nests
Use chocolate mini eggs with candy shells for extra crunch and color.
Peanut-Free Version
Substitute the peanut butter with sunflower seed butter or cookie butter for an allergy-friendly alternative.
Coconut Bird Nests
Mix shredded coconut into the cereal mixture to create a more realistic nest appearance and texture.
Storage Instructions
Store the Easter nests in an airtight container at room temperature for up to 5 days.
For longer storage, keep them refrigerated for up to 2 weeks. Allow them to sit at room temperature for a few minutes before serving for the best texture.
Frequently Asked Questions
Can I make these ahead of time?
Absolutely. These nests are perfect for preparing a day or two before your Easter celebration.
Can I freeze them?
Yes. Place the nests in an airtight freezer-safe container and freeze for up to 2 months. Thaw at room temperature before serving.
What other cereals can I use?
Rice Krispies, cornflakes, shredded wheat, or even chow mein noodles can be used to create different textures and styles of nests.
Final Thoughts
These Chocolate Peanut Butter Easter Nests are the ultimate combination of simplicity, flavor, and festive charm. With their crunchy texture, rich chocolate-peanut butter coating, and colorful candy egg topping, they make a delightful addition to any Easter dessert table.
Whether you’re creating holiday memories with your children, preparing treats for a classroom celebration, or simply satisfying a sweet tooth, these adorable no-bake nests are guaranteed to impress. Easy to make, fun to decorate, and absolutely delicious, they’re a springtime treat everyone will love.