
Introduction
If you’ve been searching for a dessert that satisfies your sweet cravings without loading up on carbs, flour, or complicated steps, these Zero-Carb Chocolate Cream Bars may become your new favorite indulgence. Rich, creamy, and deeply chocolatey, they offer a melt-in-your-mouth texture that feels luxurious while still fitting into low-carb or ketogenic lifestyles. The best part is that they are incredibly simple to prepare, requiring only a handful of ingredients and minimal effort.
These bars are perfect for anyone looking to reduce carbohydrate intake without sacrificing flavor or texture. Whether you are following a keto diet, cutting back on sugar, or simply want a quick homemade treat, this recipe delivers on all fronts. The smooth, fudge-like consistency combined with the deep cocoa flavor creates a dessert that feels indulgent yet controlled.
In this guide, you will learn everything you need to know to make these chocolate cream bars successfully, including ingredient choices, preparation techniques, variations, storage tips, and helpful tricks to ensure perfect results every time.
Why This Recipe Works
The beauty of this recipe lies in its simplicity. Traditional chocolate desserts often rely heavily on flour, sugar, and starches to create structure. In this version, those elements are replaced with ingredients that provide richness and stability without adding carbs. The result is a dense, creamy bar that holds its shape while remaining soft and smooth.
The absence of flour not only reduces carbohydrates but also gives the bars a silky, almost mousse-like interior. This makes them feel lighter on the palate while still delivering a satisfying richness.
Because the recipe uses minimal ingredients, each component plays an important role. The chocolate provides flavor and structure, the cream adds smoothness, and optional sweeteners allow you to control the level of sweetness without adding sugar.
Ingredients
To make these zero-carb chocolate cream bars, you will need the following ingredients:
- 200 grams sugar-free chocolate (dark or milk-style depending on preference)
- 1 cup heavy whipping cream
- 2 tablespoons unsalted butter
- 1 teaspoon vanilla extract
- Optional: low-carb sweetener such as erythritol or stevia (to taste)
These ingredients come together to form a rich base that sets into firm yet creamy bars once chilled.
Choosing the Right Chocolate
Since chocolate is the star of the recipe, choosing a good-quality option is essential. Look for sugar-free chocolate that uses low-carb sweeteners such as erythritol, monk fruit, or stevia. The cocoa content will influence the flavor—higher cocoa percentages create a more intense and slightly bitter taste, while lower percentages produce a smoother and sweeter result.
If you prefer a classic milk chocolate flavor, select a low-carb milk-style chocolate. For a deeper, more sophisticated taste, go with dark chocolate.
The Role of Heavy Cream
Heavy cream is what gives these bars their luxurious texture. Its high fat content allows the mixture to emulsify properly with the chocolate, creating a smooth and cohesive consistency. When chilled, the cream helps the bars firm up without becoming hard or brittle.
Using full-fat cream is important here. Lower-fat alternatives may not provide the same richness or structure.
Step-by-Step Preparation
Step 1: Melt the Chocolate
Begin by breaking the chocolate into small pieces and placing it in a heatproof bowl. You can melt it using a double boiler or in short intervals in the microwave. Stir frequently to prevent burning and ensure a smooth texture.
Step 2: Heat the Cream
In a separate saucepan, gently heat the heavy cream over low to medium heat. Do not let it boil. The goal is to warm it enough to blend easily with the melted chocolate.
Step 3: Combine Chocolate and Cream
Slowly pour the warm cream into the melted chocolate while stirring continuously. This step is crucial for creating a smooth, glossy mixture. Stir until fully combined and no streaks remain.
Step 4: Add Butter and Flavoring
Add the butter and vanilla extract to the mixture. Continue stirring until the butter is completely melted and incorporated. If you are using a sweetener, add it at this stage and adjust to taste.
Step 5: Pour and Set
Line a small pan or dish with parchment paper. Pour the chocolate mixture into the pan and spread it evenly. Tap the pan gently on the counter to remove any air bubbles.
Step 6: Chill
Place the pan in the refrigerator for at least 2 to 3 hours, or until the mixture is fully set. Once firm, remove from the pan and cut into bars.
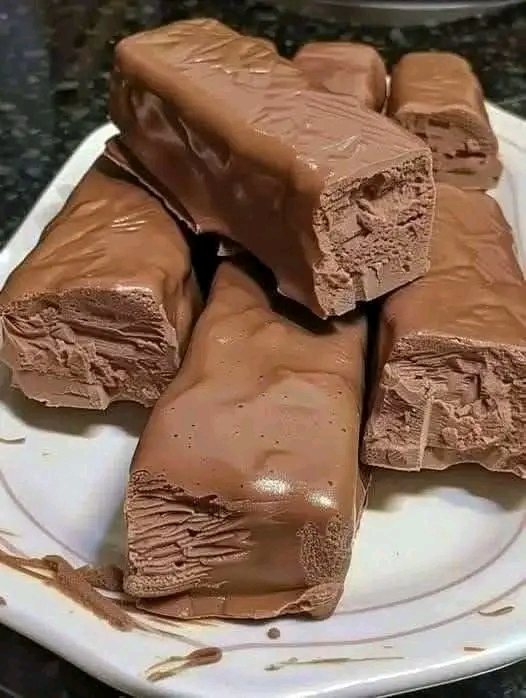
Texture and Taste
These chocolate cream bars have a unique texture that falls somewhere between fudge and mousse. They are firm enough to hold their shape but soft enough to melt quickly in your mouth. The flavor is rich and chocolate-forward, with a creamy finish that lingers pleasantly.
Because they are low in carbohydrates and free of flour, they feel lighter than traditional desserts, making them an excellent option for those who want to enjoy something sweet without feeling overly full.
Customizing the Recipe
One of the best things about this recipe is how easy it is to customize. You can adapt it to suit your taste preferences or dietary needs.
Add Nuts
Chopped almonds, walnuts, or hazelnuts can be folded into the mixture for added texture and flavor.
Incorporate Coconut
Unsweetened shredded coconut adds a subtle tropical note and a bit of chewiness.
Flavor Variations
You can experiment with different extracts such as almond, mint, or orange to create unique flavor profiles.
Layered Version
For a more visually appealing dessert, create layers by pouring half the mixture, chilling briefly, then adding a second flavored layer on top.
Storage Tips
These bars should be stored in the refrigerator to maintain their texture and freshness. Keep them in an airtight container to prevent them from absorbing odors.
They can last up to one week when properly stored. For longer storage, you can freeze them. Simply wrap each bar individually and place them in a freezer-safe container. Thaw in the refrigerator before serving.
Serving Suggestions
These bars are delicious on their own, but you can elevate them even further with simple additions:
- Serve with a dollop of whipped cream
- Sprinkle with cocoa powder or grated chocolate
- Pair with a cup of coffee or tea
- Add a pinch of sea salt on top for contrast
Health and Dietary Benefits
These zero-carb chocolate cream bars are ideal for individuals following low-carb, ketogenic, or gluten-free diets. By eliminating flour and sugar, they help reduce blood sugar spikes and support more stable energy levels.
The high fat content makes them satisfying, meaning you may find that a small portion is enough to curb cravings. This can be particularly helpful for those trying to manage portion control.
Common Mistakes to Avoid
Overheating the Chocolate
Chocolate can burn easily if exposed to high heat. Always melt it gently and stir frequently.
Boiling the Cream
Boiling can cause the cream to separate or affect the final texture. Keep the heat low and controlled.
Skipping the Chill Time
Allowing the mixture to set properly is essential for achieving the right consistency. Be patient and give it enough time in the refrigerator.
Why You’ll Love This Recipe
This recipe combines simplicity, flavor, and versatility in a way that few desserts can. It requires no baking, minimal ingredients, and delivers a result that feels indulgent and satisfying.
Whether you are making it for yourself, your family, or guests, it is a reliable option that can be prepared quickly and enjoyed by everyone.
Conclusion
Zero-Carb Chocolate Cream Bars are proof that you don’t need flour, sugar, or complicated techniques to create a delicious dessert. With just a few simple ingredients and steps, you can enjoy a rich, creamy treat that fits perfectly into a low-carb lifestyle.
Easy to make, endlessly customizable, and deeply satisfying, this recipe is one you’ll want to keep in your collection. The next time you crave something sweet, you’ll have a go-to dessert that is both indulgent and mindful.
Once you try these bars, you may find yourself making them again and again—not just because they are easy, but because they truly deliver on flavor, texture, and satisfaction.