
Banana Pudding Cheesecake Cones
If you love creamy desserts that combine classic comfort flavors with fun presentation, Banana Pudding Cheesecake Cones might become your new favorite treat. This delightful dessert brings together the rich tanginess of cheesecake, the nostalgic sweetness of banana pudding, and the satisfying crunch of waffle cones. The result is a handheld dessert that feels both indulgent and playful.
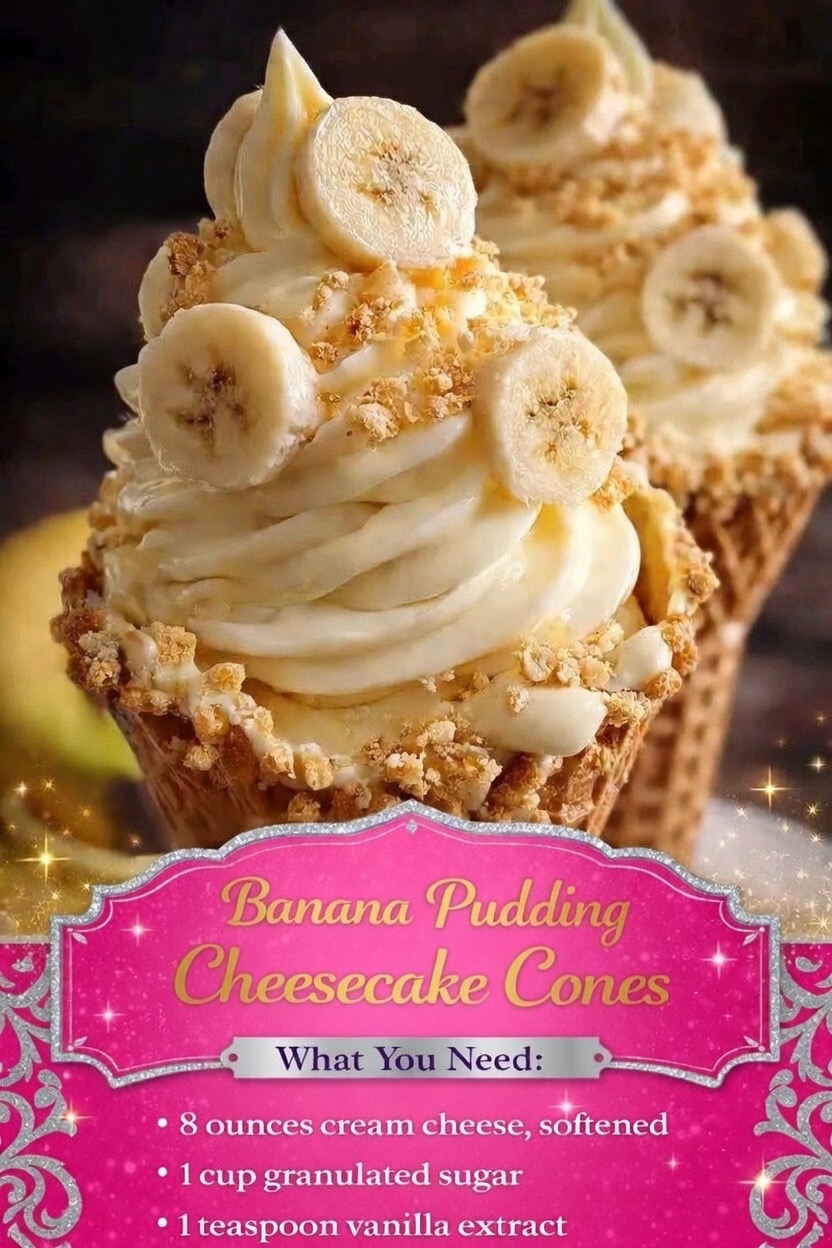
Perfect for parties, family gatherings, summer picnics, or even a simple weekend treat, these cones deliver a beautiful balance of textures and flavors. The smooth cheesecake filling blends with banana pudding and crushed vanilla wafers, while the cone adds a crisp bite that makes every spoonful irresistible.
In this guide, you’ll learn how to make Banana Pudding Cheesecake Cones from scratch, along with tips, variations, storage ideas, and serving suggestions so you can turn this simple dessert into something truly special.
Why You’ll Love Banana Pudding Cheesecake Cones
There are plenty of reasons this dessert has become so popular among dessert lovers:
1. Easy to Prepare
You don’t need advanced baking skills to make these cones. The filling comes together quickly and doesn’t require complicated techniques.
2. Perfect Individual Portions
Each cone is a single serving, making them great for parties or events where guests can grab a dessert without needing plates or utensils.
3. Nostalgic Flavor Combination
The combination of bananas, creamy pudding, vanilla wafers, and cheesecake brings together flavors many people grew up loving.
4. Great for Any Season
While they’re especially refreshing in summer, Banana Pudding Cheesecake Cones are delicious year-round.
Ingredients
To make these delicious cones, you’ll need a few simple ingredients.
Cheesecake Filling
- 8 ounces cream cheese, softened
- 1 cup granulated sugar
- 1 teaspoon vanilla extract
- 1 cup heavy whipping cream
- 1 package instant banana pudding mix
- 1 ½ cups cold milk
Banana Pudding Layers
- 2 ripe bananas, sliced
- 1 cup crushed vanilla wafers
- ½ cup whipped topping
Cones
- 8 waffle cones or sugar cones
Optional Garnishes
- Extra whipped cream
- Crushed vanilla wafers
- Banana slices
- Caramel drizzle
Kitchen Tools You’ll Need
Preparing this dessert is easier when you have the right tools ready.
- Large mixing bowl
- Electric mixer or whisk
- Rubber spatula
- Piping bag or zip-top bag
- Spoon
- Knife and cutting board
Step-by-Step Instructions
Step 1: Prepare the Cheesecake Base
In a large mixing bowl, beat the softened cream cheese with the granulated sugar using an electric mixer. Continue mixing until the mixture becomes smooth and creamy without lumps.
Add the vanilla extract and mix again until fully combined. This step creates the rich cheesecake flavor that makes this dessert so special.
Step 2: Make the Banana Pudding
In a separate bowl, combine the instant banana pudding mix with the cold milk. Whisk the mixture for about two minutes until it thickens.
Let it sit for about five minutes so it can fully set.
Step 3: Whip the Cream
In another bowl, whip the heavy cream until soft peaks form. This adds lightness and fluffiness to the cheesecake mixture.
Once whipped, gently fold the cream into the cream cheese mixture. Use a spatula and mix slowly so the mixture stays airy.
Step 4: Combine Cheesecake and Pudding
Next, fold the prepared banana pudding into the cheesecake mixture.
Mix gently until everything is smooth and evenly blended. The result should be a creamy banana cheesecake filling that’s thick enough to pipe or spoon into the cones.
Step 5: Prepare the Cones
Take your waffle cones and place them upright in glasses or a cone holder so they stay steady while filling.
This makes the assembly process much easier and prevents spills.
Step 6: Add the First Layer
Start by adding a small spoonful of crushed vanilla wafers to the bottom of each cone.
This layer gives the dessert a crunchy texture and mimics the classic banana pudding crust.
Step 7: Fill with Cheesecake Mixture
Transfer the banana cheesecake filling into a piping bag or zip-top bag with the corner cut off.
Pipe a layer of filling into each cone.
Step 8: Add Bananas and Cookies
Add a few banana slices and another sprinkle of crushed vanilla wafers.
These layers help recreate the classic banana pudding flavor profile.
Step 9: Repeat the Layers
Add another layer of cheesecake filling until the cone is full.
Top it with whipped topping for a beautiful finishing touch.
Step 10: Garnish
Decorate the cones with:
- Extra crushed vanilla wafers
- Banana slices
- A drizzle of caramel sauce
This final step makes the cones look irresistible and perfect for serving.
Tips for the Best Banana Pudding Cheesecake Cones
Use Ripe Bananas
Ripe bananas provide the best flavor and natural sweetness.
Chill the Filling
If the filling feels too soft, refrigerate it for about 20 minutes before filling the cones.
Assemble Right Before Serving
To keep the cones crispy, assemble them shortly before serving.
Fun Variations
One of the best things about this dessert is how easy it is to customize.
Chocolate Banana Cheesecake Cones
Add a few tablespoons of cocoa powder or melted chocolate to the cheesecake filling for a chocolate twist.
Strawberry Banana Version
Add sliced strawberries along with the bananas for a fruity flavor combination.
Caramel Banana Cones
Drizzle caramel sauce between the layers for a rich dessert.
Serving Ideas
Banana Pudding Cheesecake Cones are great for many occasions.
Serve them at:
- Birthday parties
- Summer barbecues
- Family gatherings
- Baby showers
- Dessert tables
You can also set up a DIY cone station where guests choose their toppings.
Storage Tips
These cones are best eaten fresh, but the filling can be stored ahead of time.
Refrigerator:
Store the cheesecake filling in an airtight container for up to 3 days.
Do Not Freeze:
Freezing may affect the texture of the pudding and cream.
Nutritional Information (Approximate)
Per cone:
- Calories: 320
- Carbohydrates: 34g
- Protein: 5g
- Fat: 18g
Values may vary depending on ingredients used.
Frequently Asked Questions
Can I make this dessert ahead of time?
Yes, you can prepare the filling in advance and store it in the refrigerator. Fill the cones just before serving.
Can I use homemade pudding?
Absolutely. Homemade banana pudding works wonderfully in this recipe.
Can I make it gluten-free?
Yes. Simply use gluten-free cones and gluten-free vanilla cookies.
Final Thoughts
Banana Pudding Cheesecake Cones are a fun, creative dessert that combines beloved flavors in a convenient handheld treat. With their creamy filling, crunchy cookie layers, and crisp cone shell, they deliver a perfect bite every time.
Whether you’re preparing dessert for a special celebration or just craving something sweet and nostalgic, these cones are sure to impress friends and family.
Once you try them, don’t be surprised if they become a regular favorite in your dessert rotation.